

")


Our kitchen renovation is finally complete and unlike HGTV, it’s only taken about 9 months. The pandemic made lots of homeowners start considering renovating their homes and in doing so, contractors became REALLY backed up. We were lucky we didn’t experience too many delays in our materials but we did have to practice some patience.
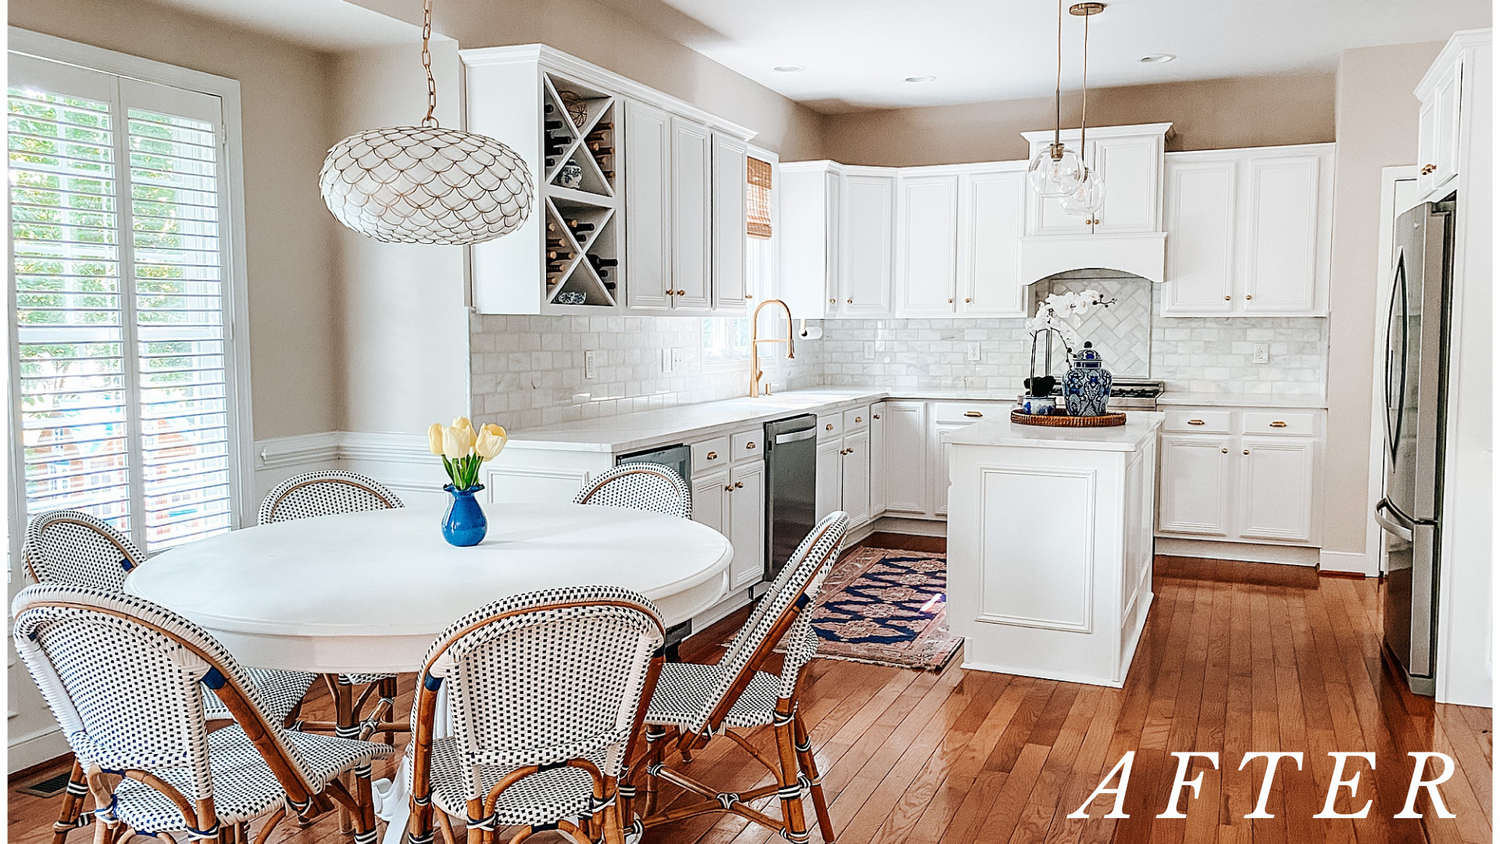
Our main goals for this space were to update the finishes to move away from the “French Country” style we had going on & to brighten the back of our house, because it is one of the rooms the gets the least amount of natural light. I will share the different changes we made as well as a budget breakdown on what we spent on each part of the process.
Scroll to the bottom for sources of where we purchased the various materials as well.
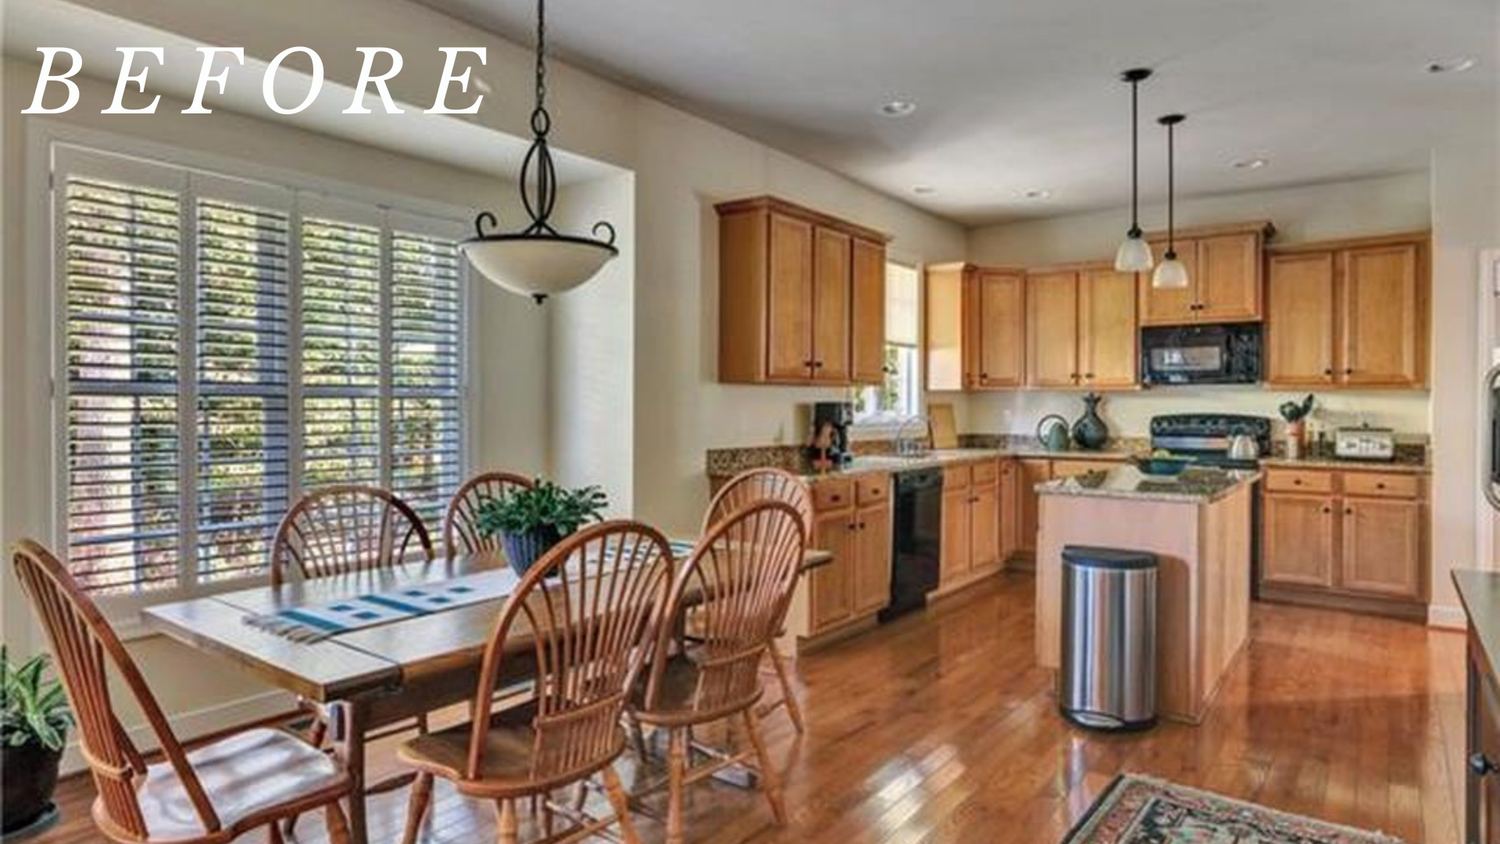
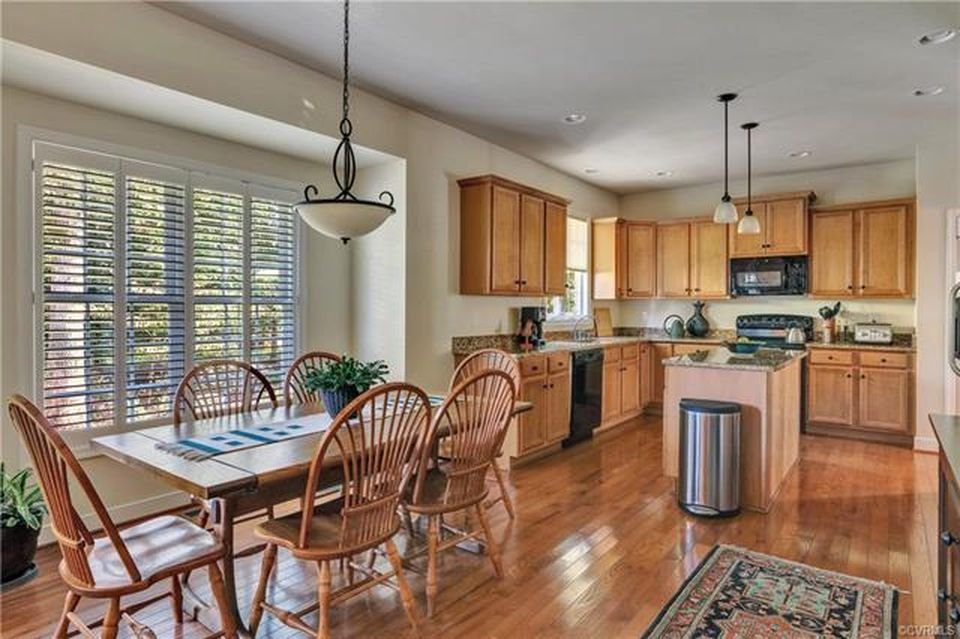
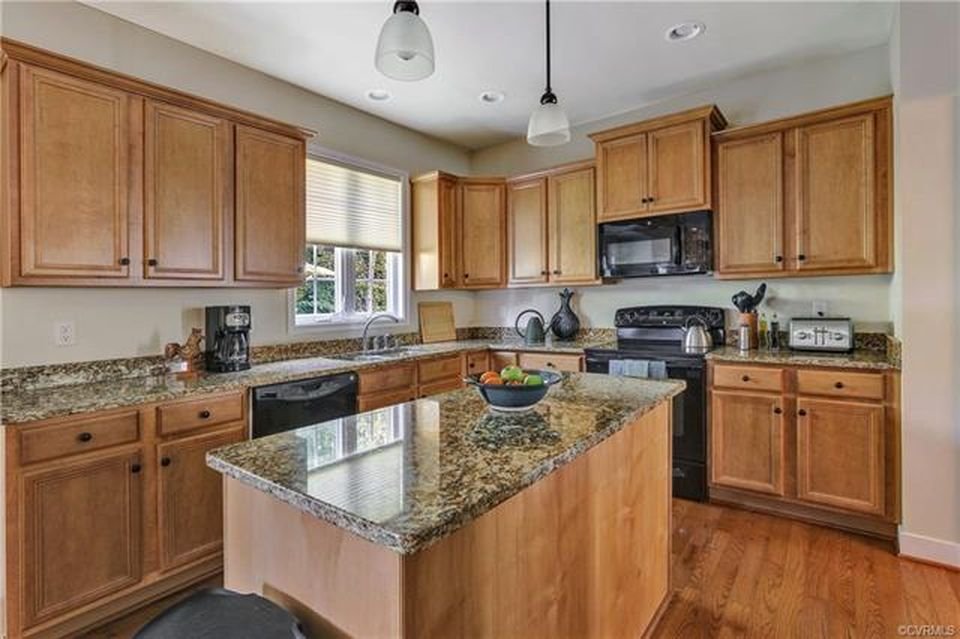
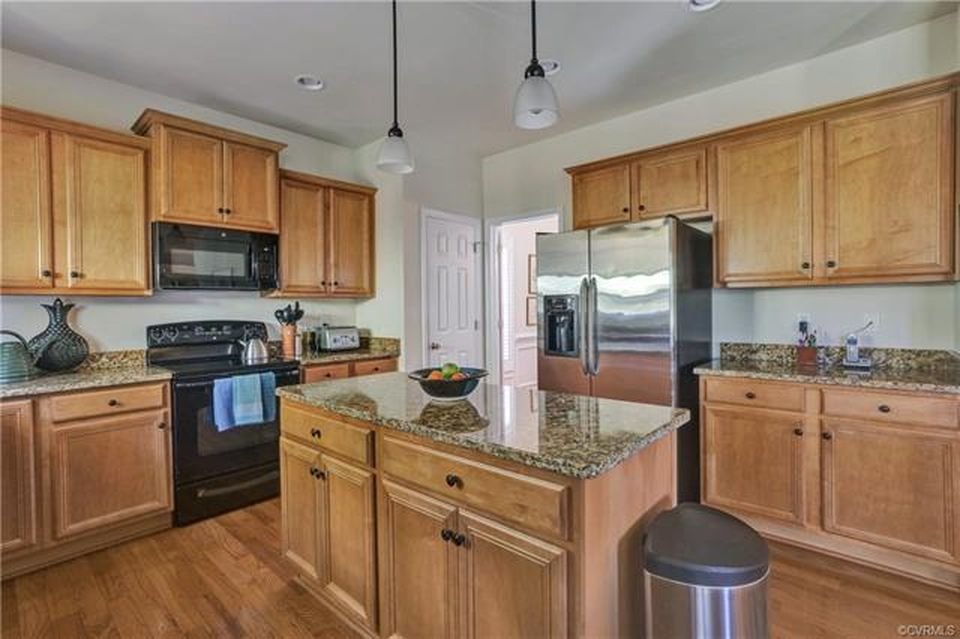
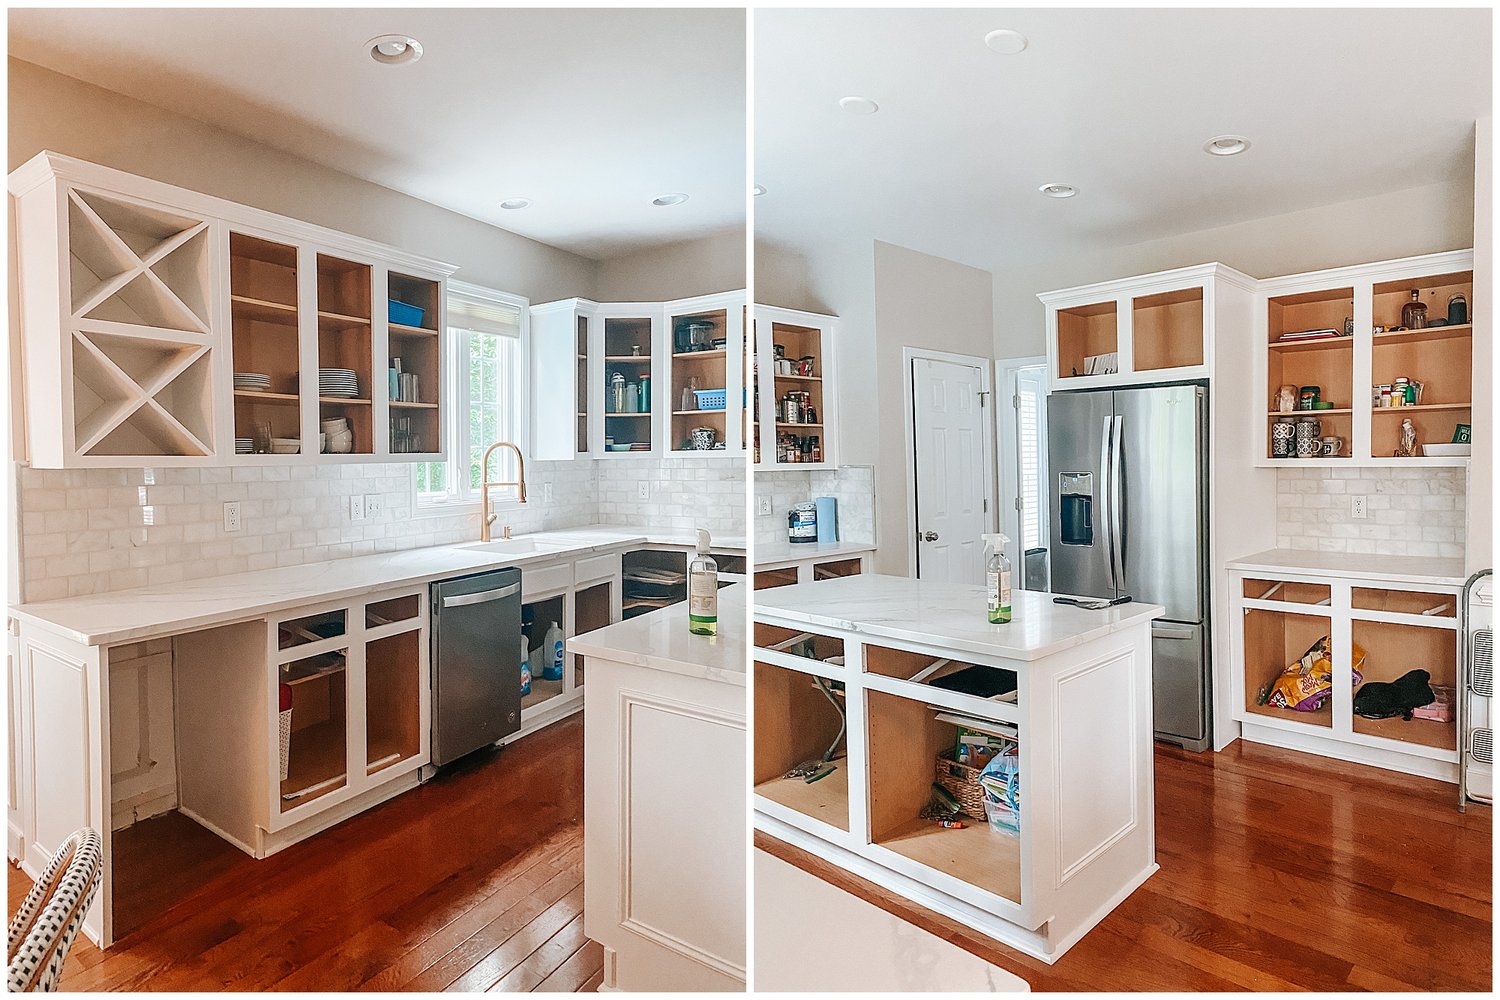
To refresh your memory, here is what our kitchen looked like when we moved in. Our house was built in 2009 and French Country was all the rage in kitchen design.
Before Photos
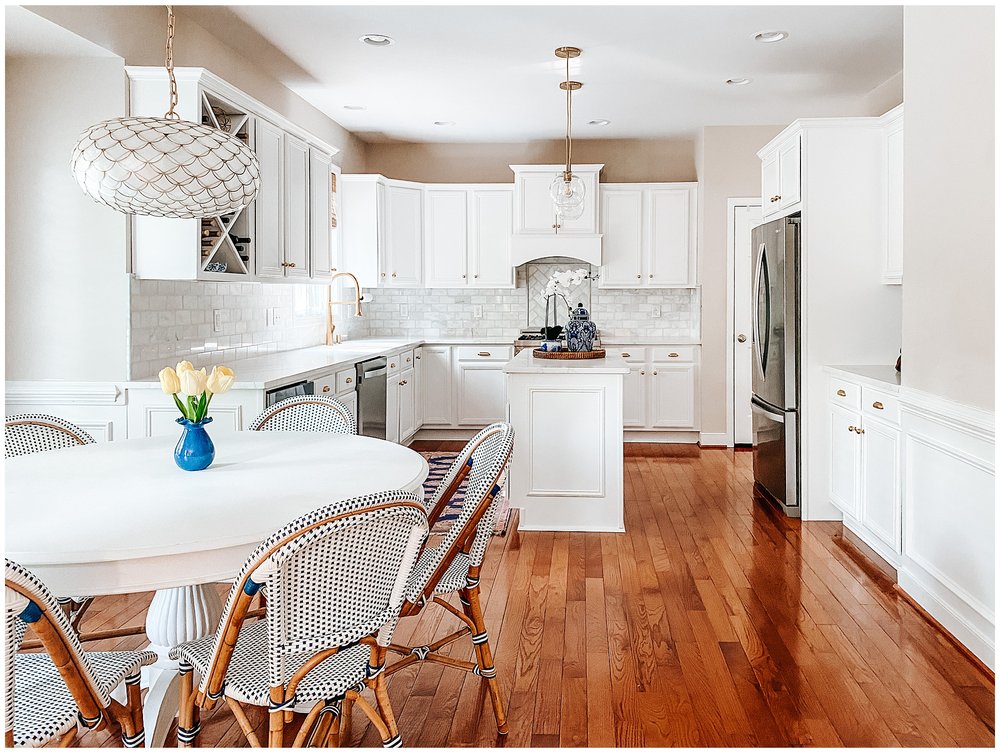
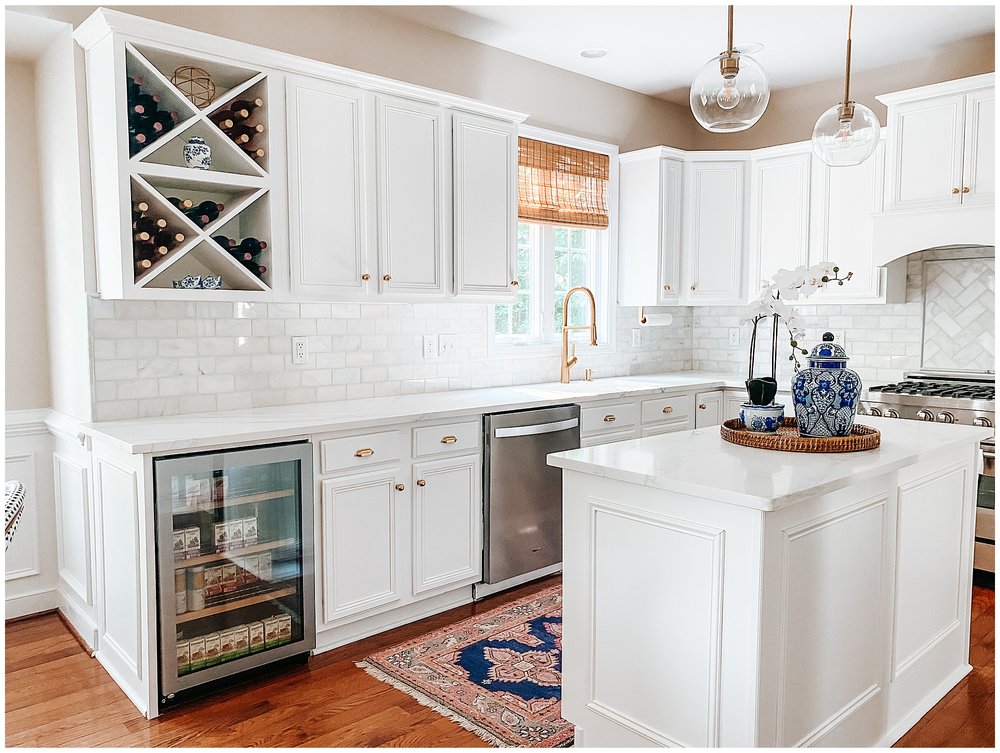
After Photos

Appliances
As you can see from the original listing photos, pretty much all of the appliances had to go. The refrigerator was the only one we considered keeping and it died a few months after moving in – so an entire new appliance suite it was! We purchased them over time (mainly because the fridge died before we were ready to renovate). We ended up with a few different brands of appliances but shhh don’t tell – that’s never really bothered me anyway, as long as the finishes are similar.
Overall, we purchased the fridge, dishwasher, microwave (in the pantry), range hood (built in), range, and beverage fridge. We are freaks for a scratch and dent deal at Lowe’s so we definitely saved some money here. We somehow ended up only paying $500 for the gas range. It was originally ordered for a custom home and the homeowners purchased a different one and didn’t need it. We found it one night at Lowe’s and took it right home.
Appliance Budget $3,000
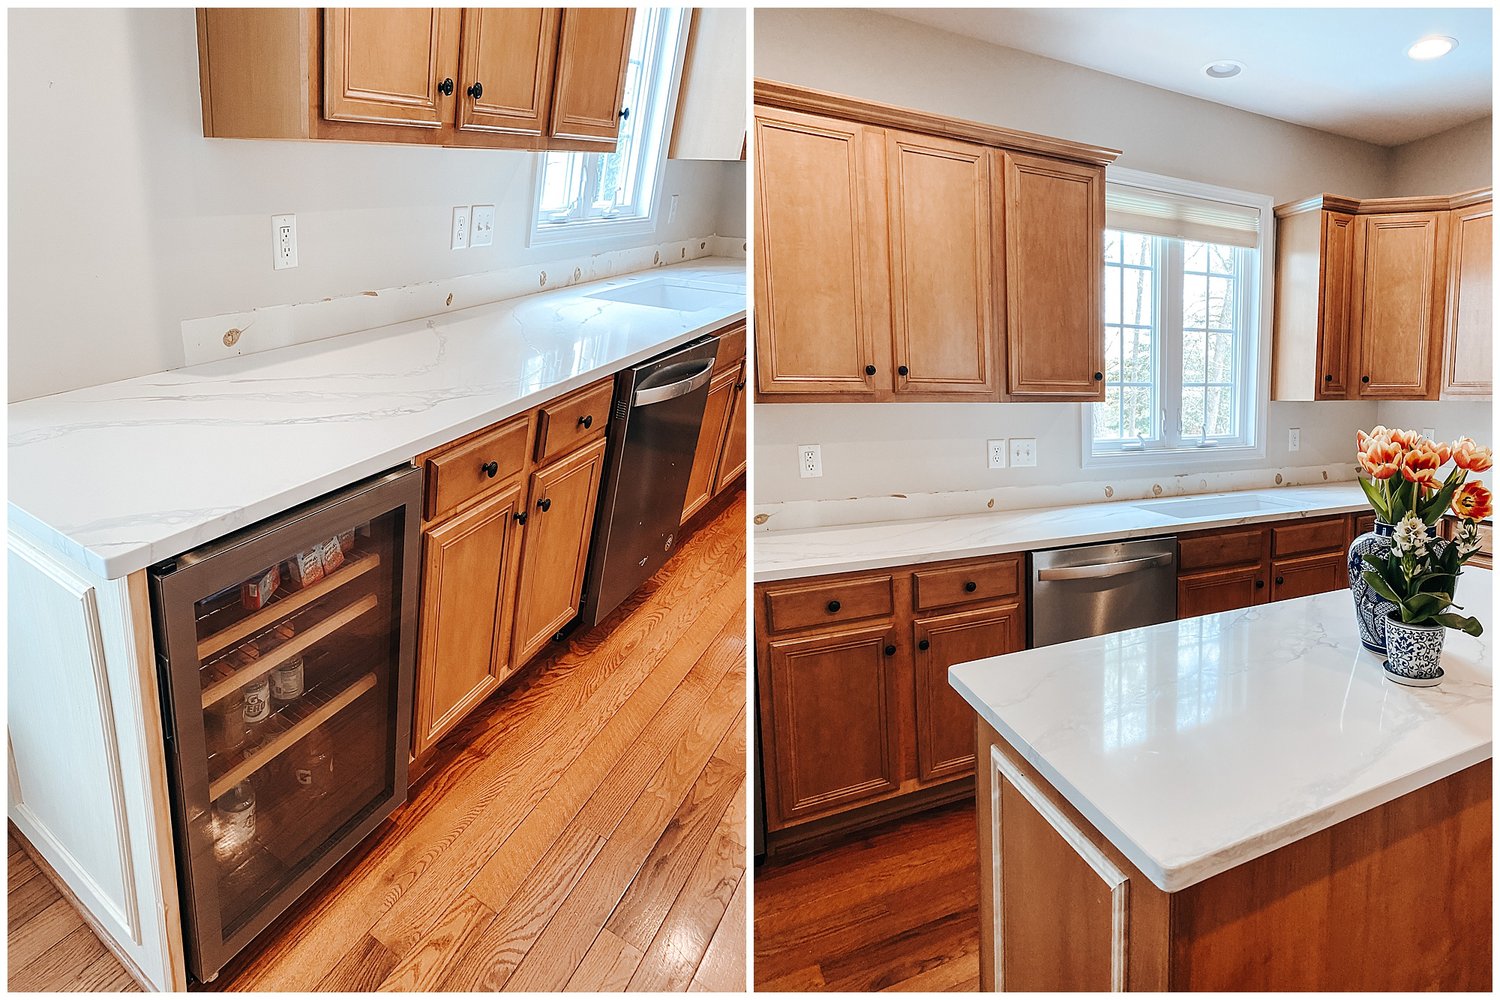
Quartz Countertops
The biggest step of the project was the countertops and it was when our vision was starting to make sense. We decided on a quartz countertop because of its durability. They were purchased from Panda Kitchen and Bath in the West End of Richmond and were priced at $55 per square foot. Jake and I disagreed on the final choice and I actually let him go with his favorite (shocking, I know). I did get to choose most of the other finishes & luckily I didn’t totally hate the one he wanted.
Since we added in the beverage fridge into our kitchen layout, our price went up a little at our final measurements. Panda Kitchen & Bath came in and took the existing counters out and installed the new ones all in about 3-4 hours. Jake kept the old countertops for an outdoor bar he is planning in the future…
Countertops $4,123

Backsplash
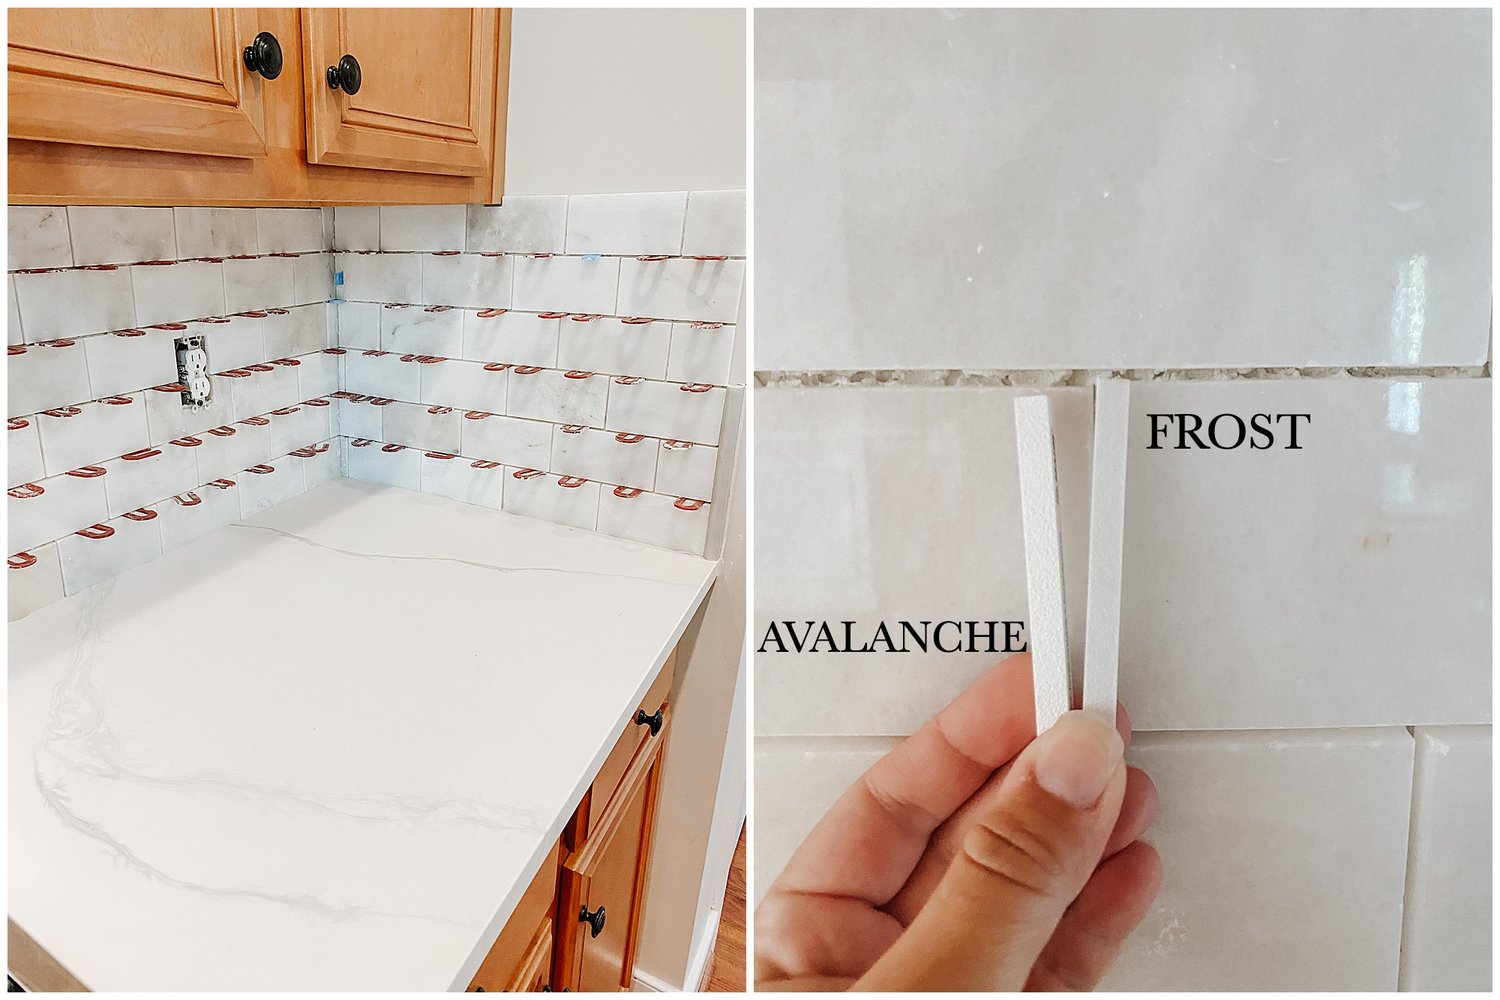
This step deserves an entire blog post all in itself but that will be coming soon. Picking the backsplash was probably where I went back and forth the most, but ultimately it is my favorite part of the renovation. We started with a few options from big box stores; however, when we hired our tile installer he really recommended against purchasing from one of those stores. There were a few reasons that I will go into in the blog post about backsplash selection but mainly it all revolved around that the quality just wasn’t as reliable as going through a local tile distributer.
We used Gifford Ceramic Tile for installation (highly recommend him!) and the tile was purchased through Morris Tile Distributors in Richmond, VA. The wall tile is Greecian White Marble 3×6 Polished tile and the pencil trim is Greecian White Polished Pencil 3/4 x 12 Marble. We used a Frost colored grout.
Backsplash – installation & materials $2,962

Miscellaneous Trim Work
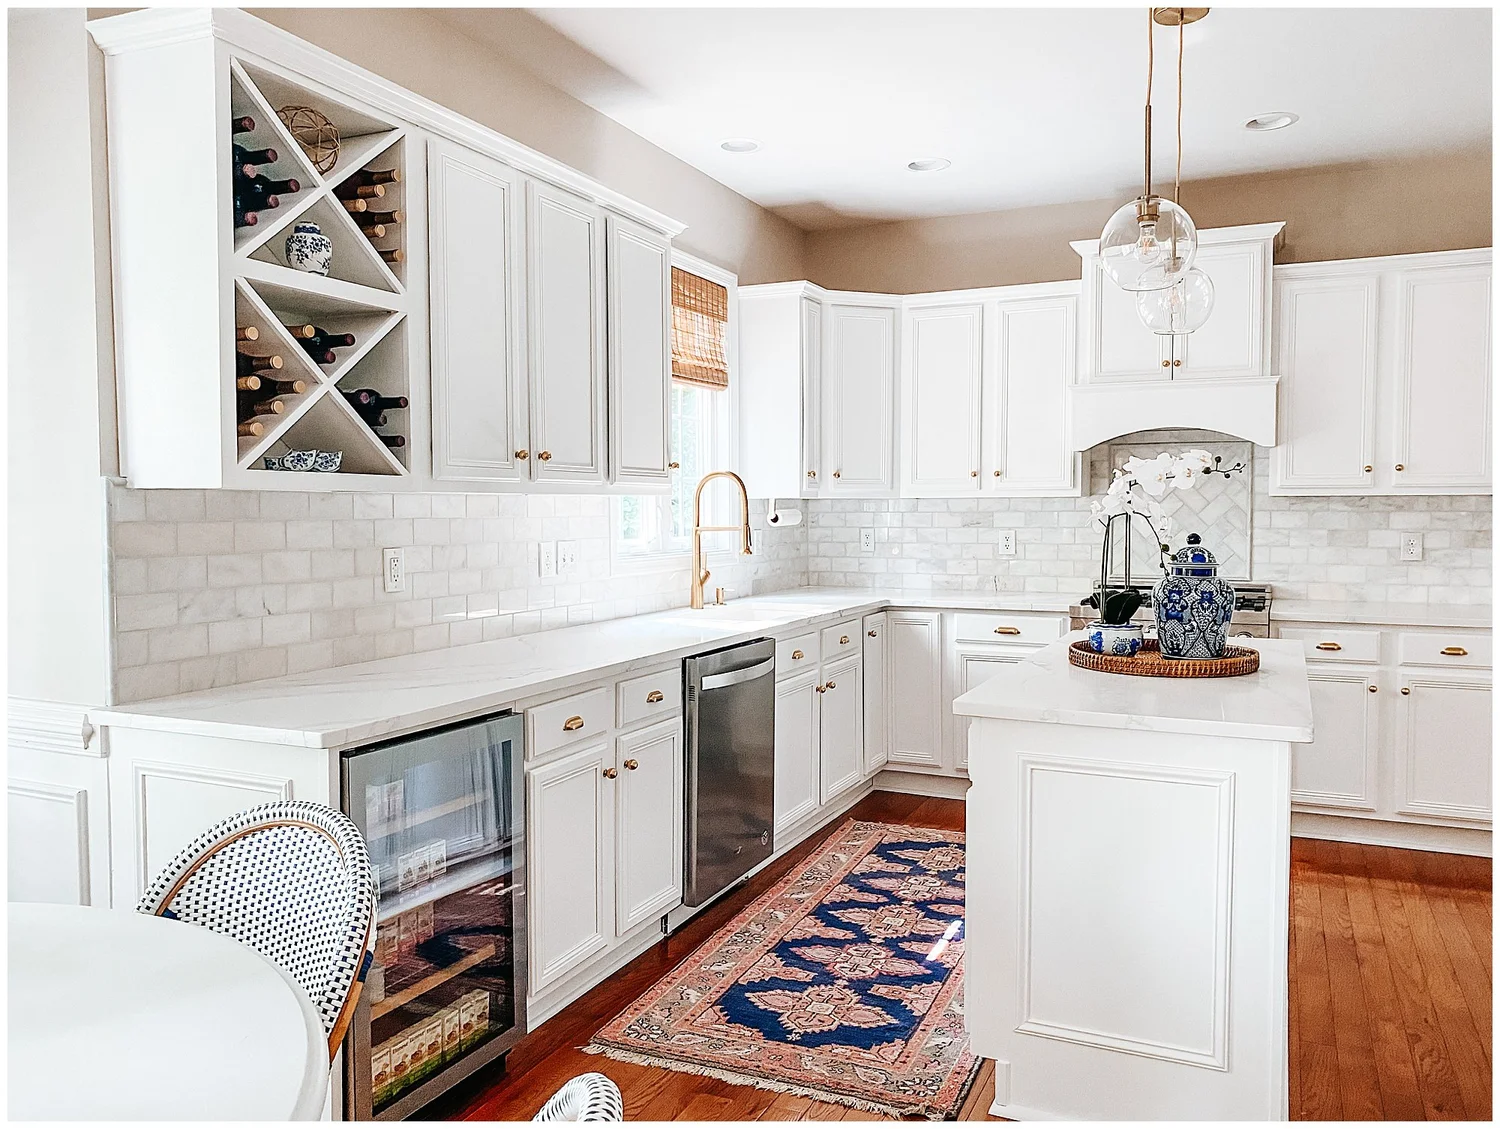
Throughout the renovation, we kept finding ways to make a few custom changes to the kitchen. This one is the hardest to quote because we purchased all of the materials and did the work ourselves. For example, we decided to add panels to the side of the refrigerator to make it look built in, built in a beverage fridge and added a wine rack, built the range hood, and added trim to the sides of the cabinets and island.
Funny side note/story – my husband found a great deal on a scratch & dent fridge at Lowe’s that only had one small scratch on the bottom. When you buy scratch and dent though, you have to haul it home yourself. When loading it onto his trailer, he slipped and put a huge dent in the side of the fridge. Of course it was the side you look at when you’re in our kitchen. My solution was to panel in the refrigerator to make it look built in and hide the dent. Honestly it worked out great but it was definitely more work than Jake bargained for when he first bought that discount fridge.
In materials, we spent around $800, but to hire it out, I would guess it would have been closer to $3,500.
Custom woodwork $800
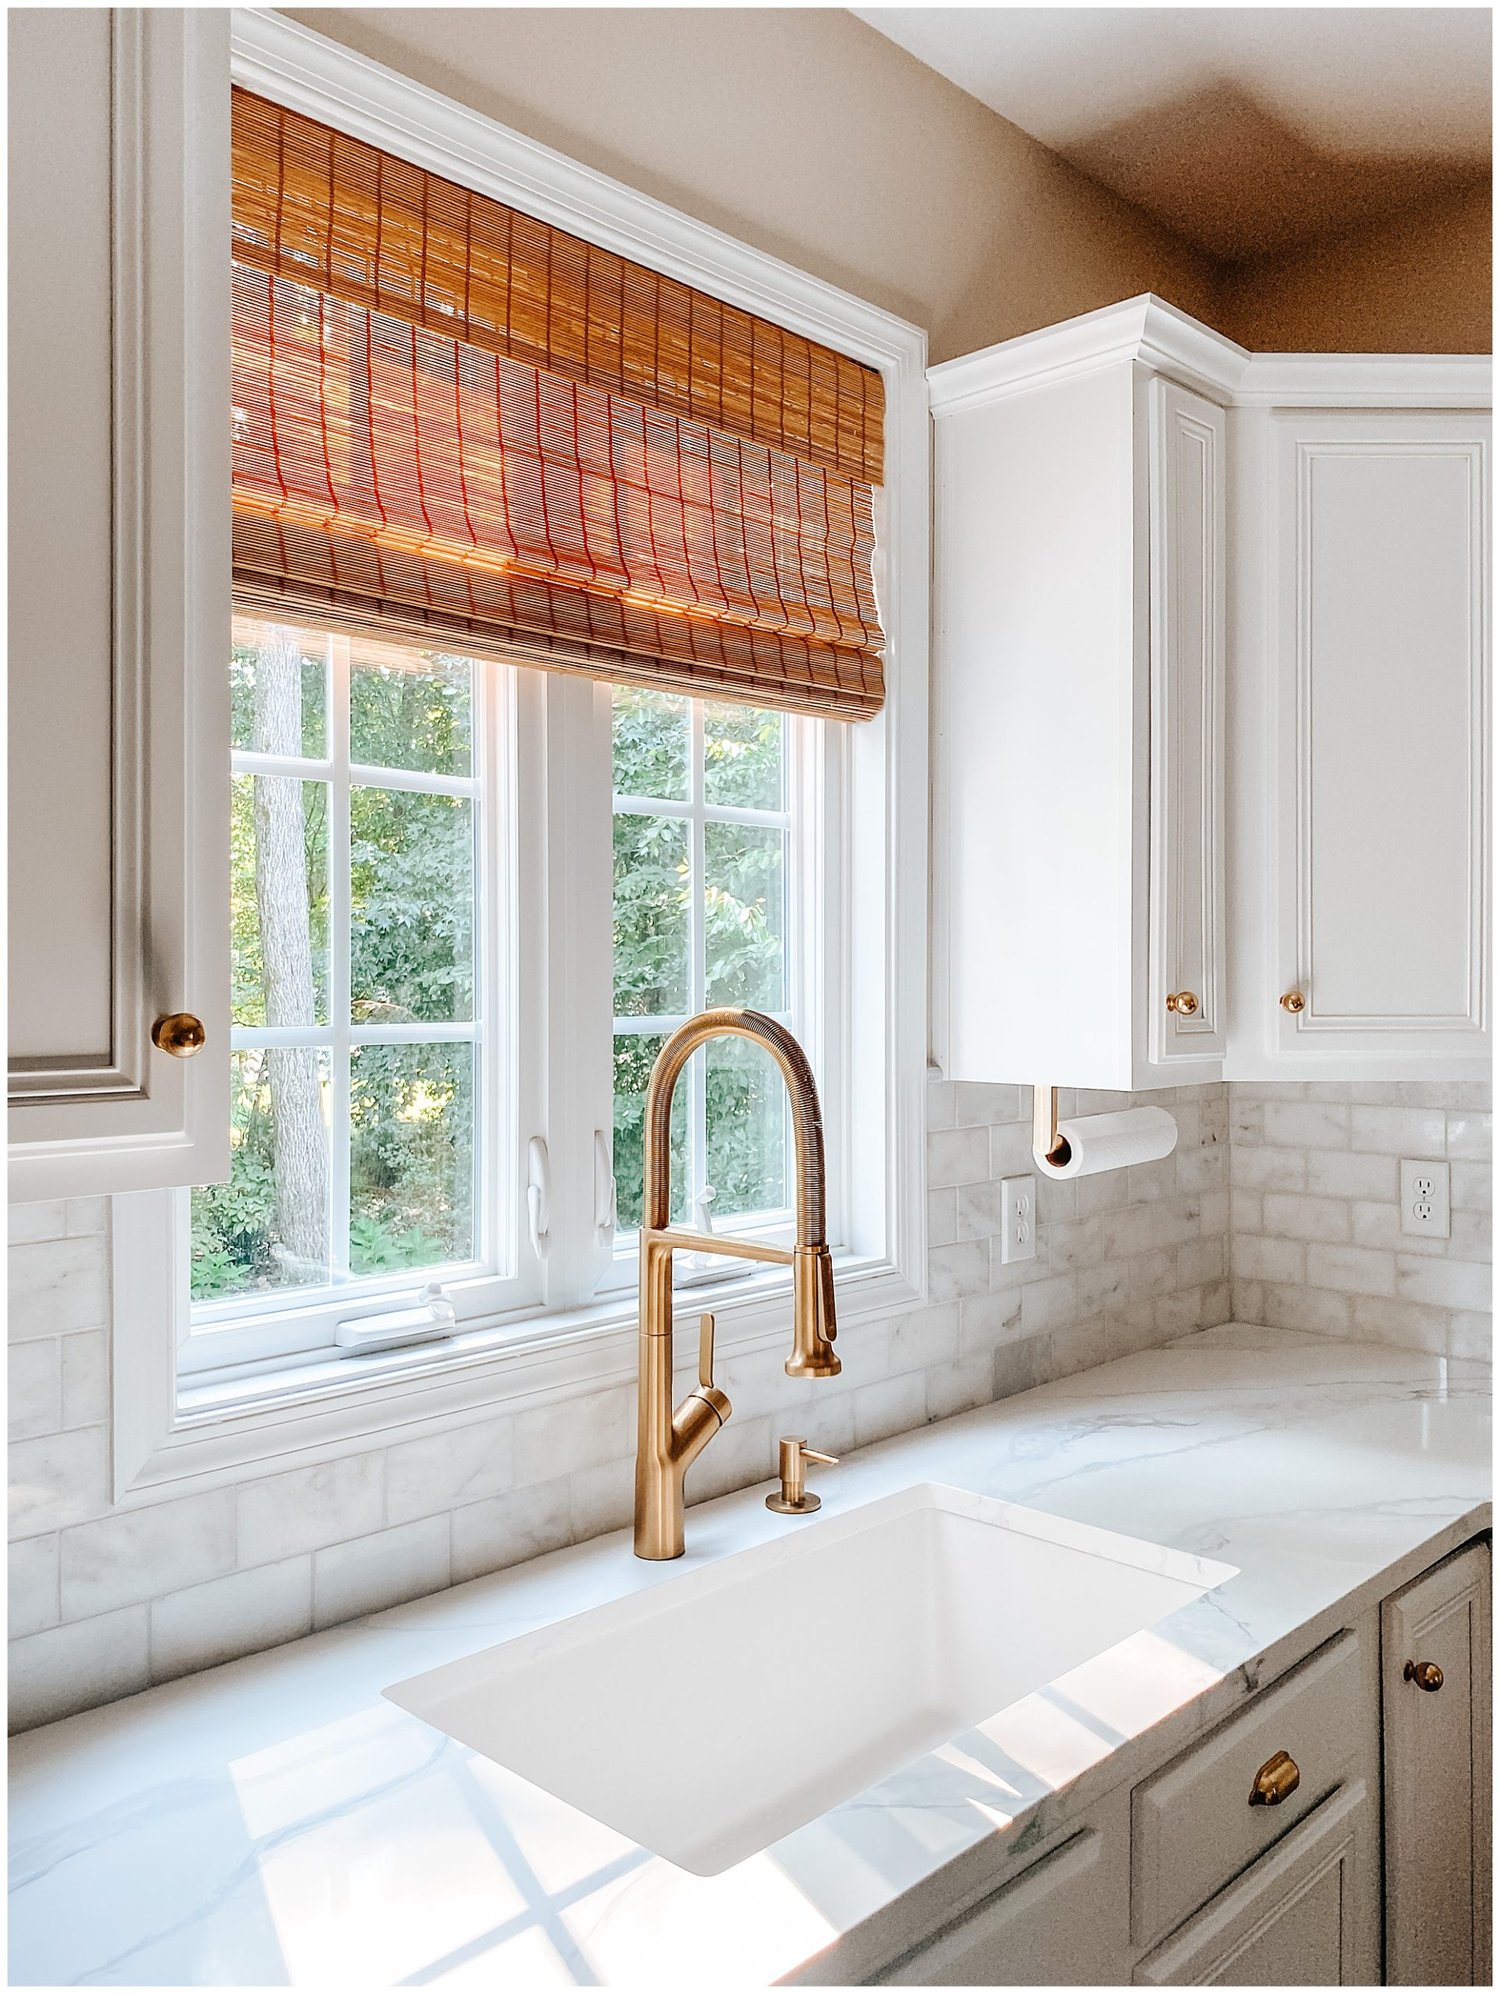
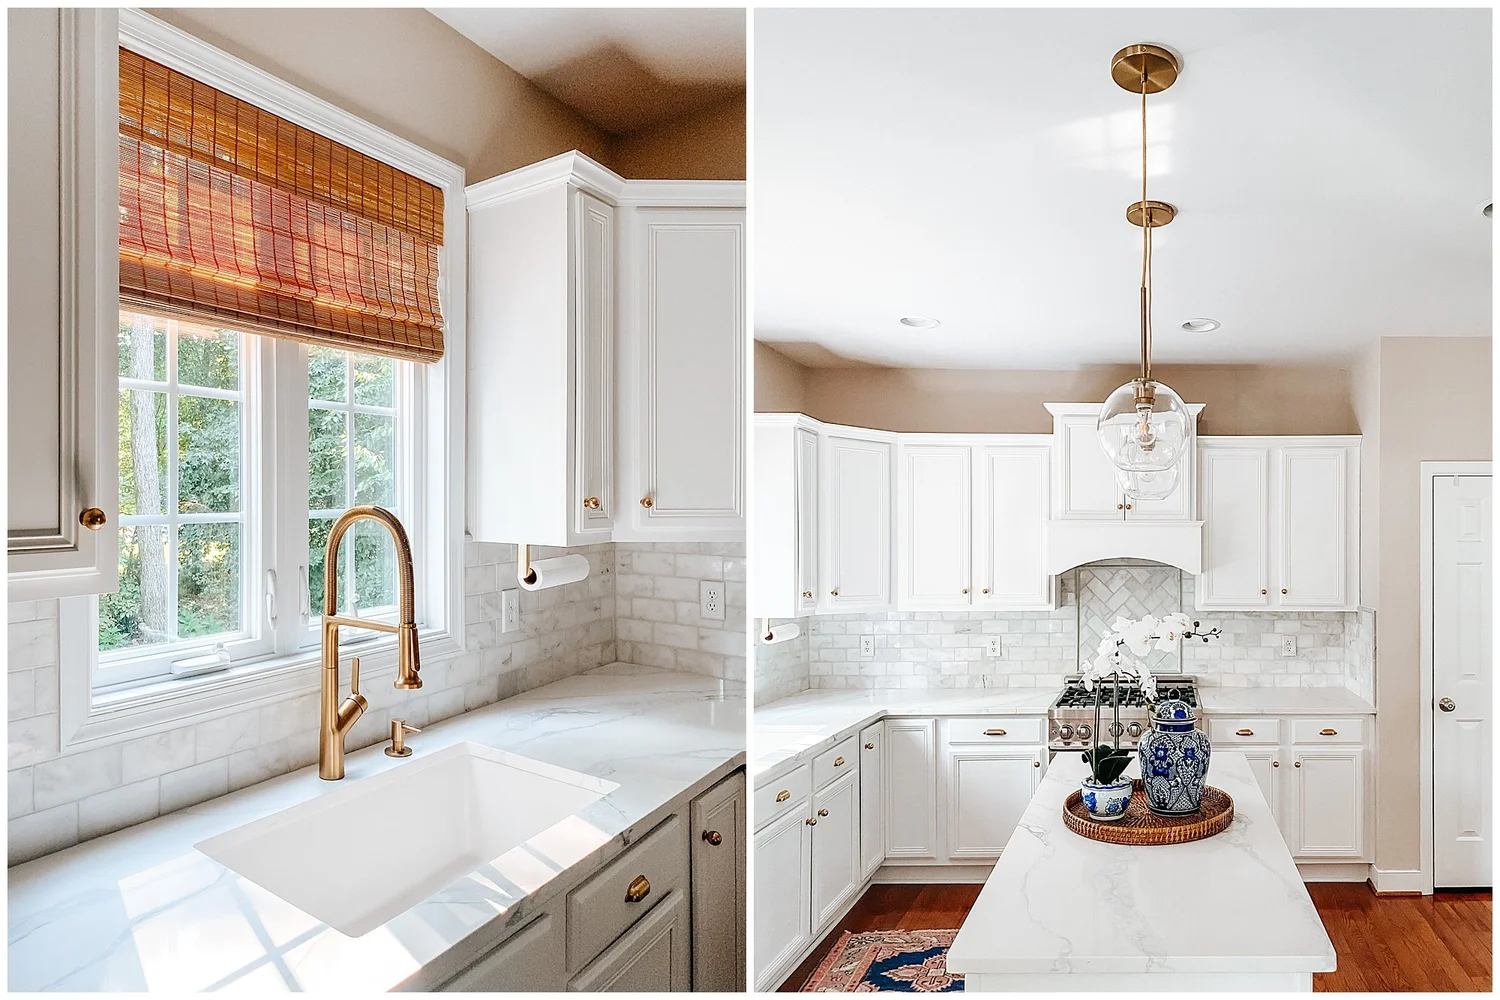
Sink & Faucet
I won’t lie, I am obsessed with our new sink. We went from a small two basin sink to this large white one and it sounds dramatic, but it was rather life changing. Not only is it much prettier, but the single basin seems to just work much better for us. We have scratched it a few times but so far everything has wiped off with a sponge or magic eraser.
I also went back and worth over which faucet to order for a while. I took a risk on the brass faucet but I am incredibly pleased with how it turned out. Some options we looked at were upwards of $1,000 so finding this faucet for such a good price was quite a win. We are also really happy with how the faucet works – the pull down feature is great and it is obviously a show piece in a kitchen.
$675
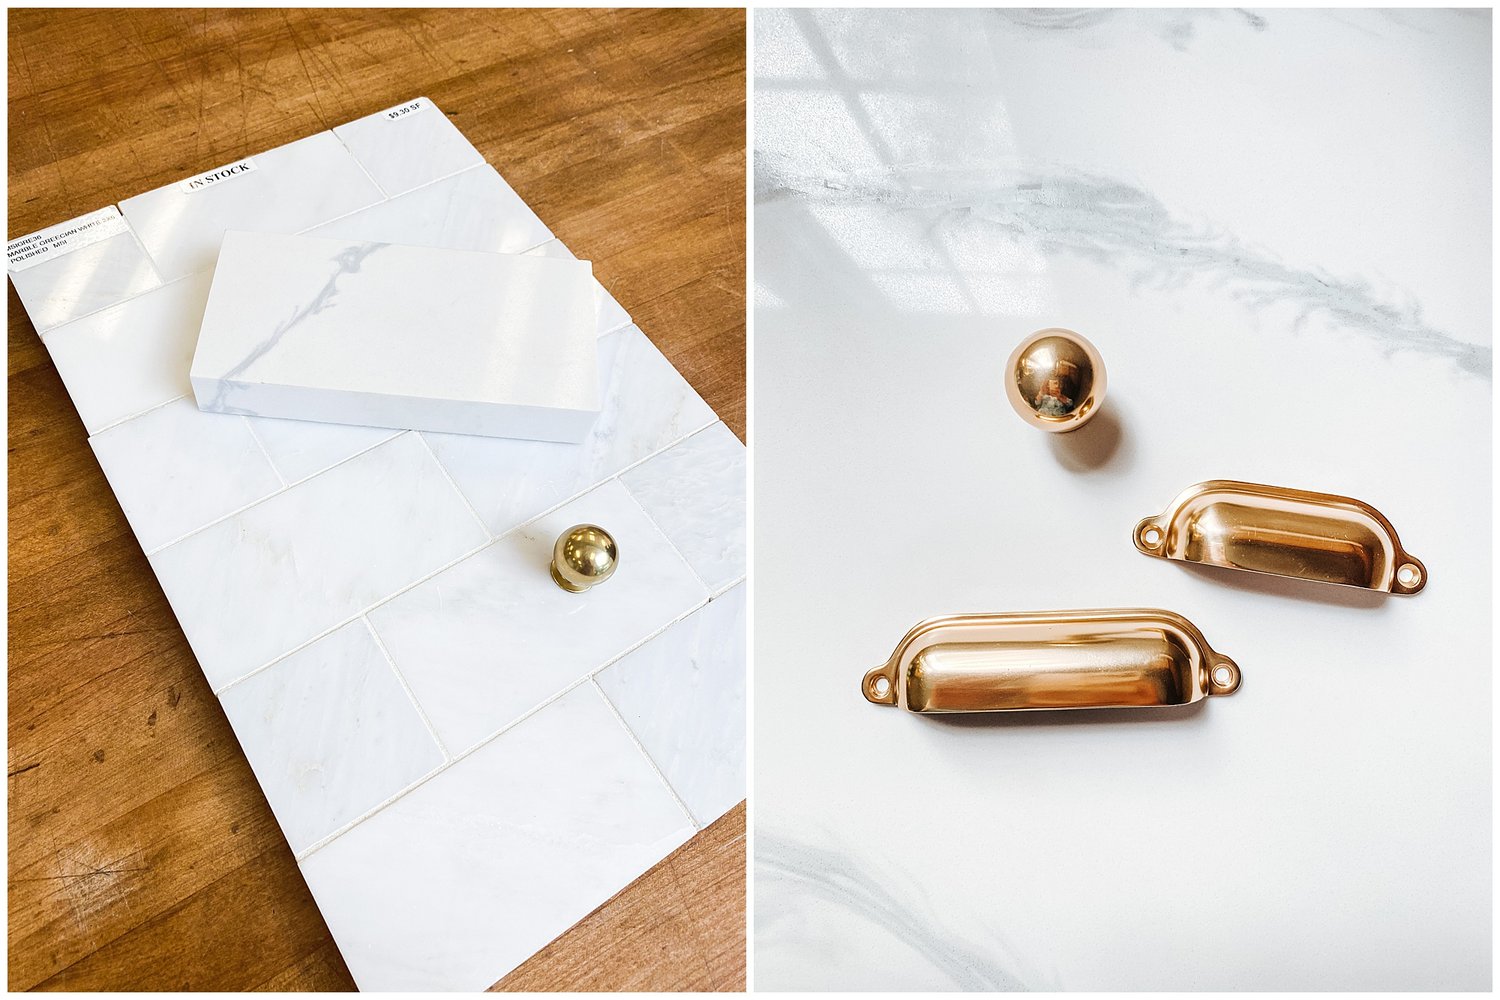
Cabinet Hardware
For the hardware, we stuck with the brass knobs that we have used on the built in cabinets around our house. We have been happy with Rejuvenation’s quality and after looking at other options, I couldn’t find anything else I liked more. Most people are going with long pulls these days but I felt drawn to the simpler knobs for our small kitchen. For the drawers, we switched it up just a bit and added bin pulls.
Jake’s personal favorite hardware addition is the brass paper towel holder. I will warn you, it’s more than I ever expected to spend on a paper towel holder but it is very handy (& pretty). Rejuvenation does offer quite a few occasional sales though and you can often get 20% off your order.
$550
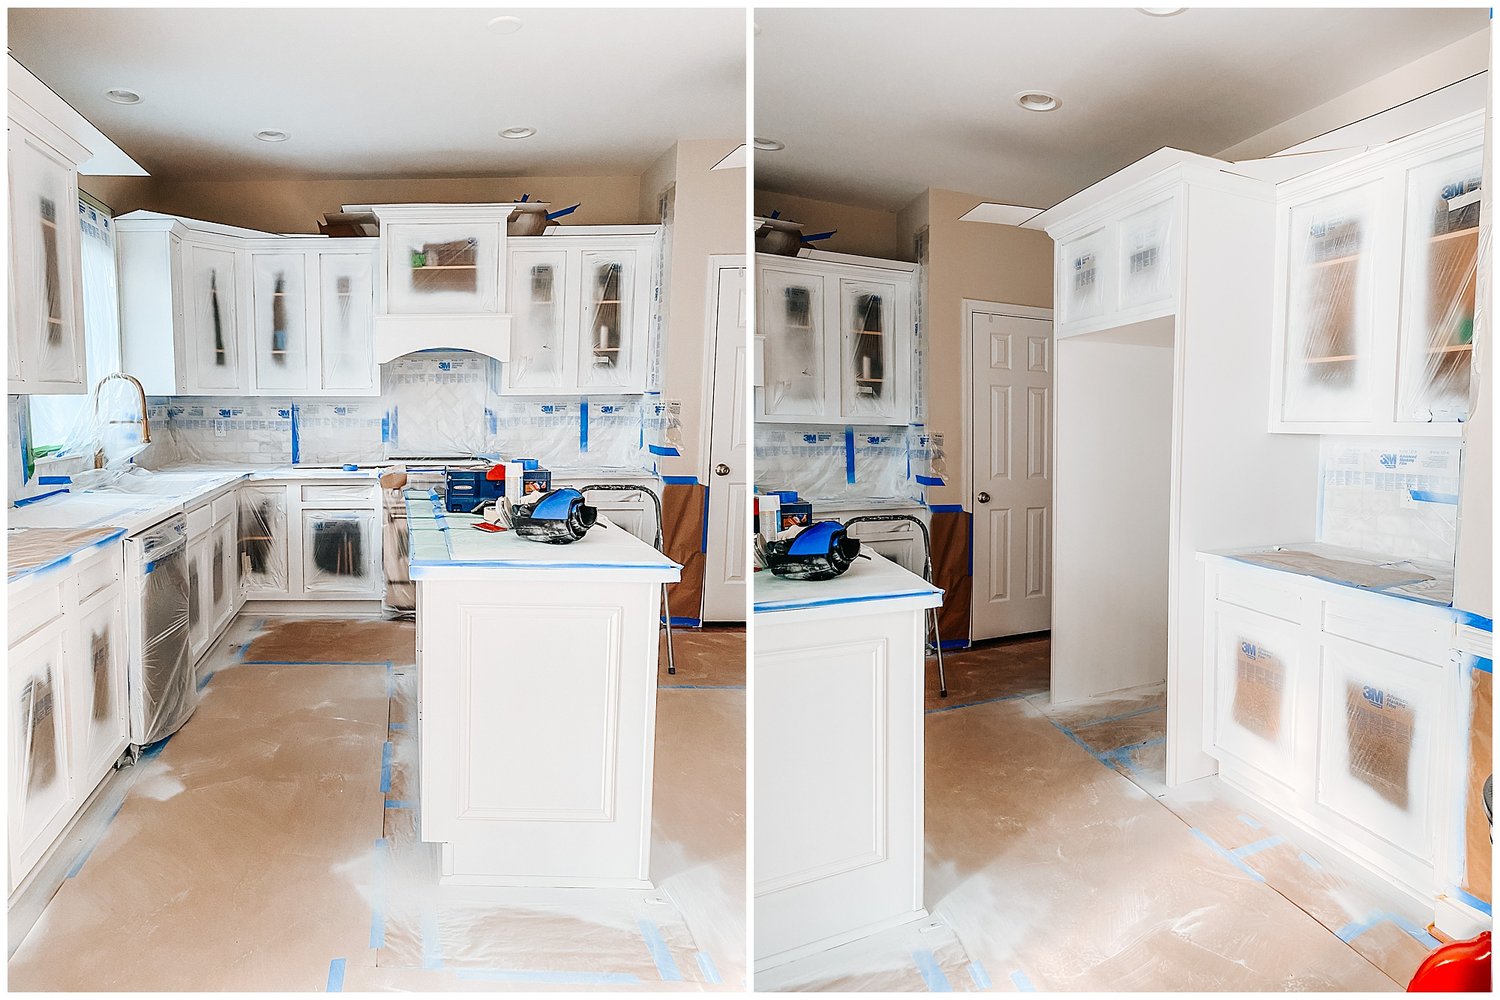
Cabinet Painting
Painting the cabinets was the last big step, and certainly the most impactful. There are a million and one tutorials about how to paint your cabinets but as a realtor, I just knew too many people ruin their kitchens attempting this themselves. We received quotes from a few different painters and ended up working with Mike from All About Paint. We had a great experience. We booked him about 8 months out and waiting was the hardest part.
I will warn you – quotes for a project like this range dramatically! Some painters will be painting with a brush, others will spray them, and it’s important to know what kind of paint and finish your cabinets will have. Send me a message if you have questions about the process & what to look for.
This step took about a week to complete. It started with having the cabinet and drawer fronts removed and cleaned, sanded, primed, and painted. The next few days, the cabinets were masked off and prepped for painting. At this point, you lose access to your kitchen so we moved some important things to our dining room and pulled the fridge out so we could still use it. However, it was a pretty good excuse to not have to cook.
The final days were spent priming and painting all of the cabinet boxes and trim, then installing the cabinets and drawer fronts and hardware again.
The kitchen is definitely much brighter now that it is white. We went back and forth on the paint color and ultimately settled on using Benjamin Moore Chantilly Lace. I selected this color because it is a very bright white and has very few undertones that would make the cabinets look either slightly yellow or blue. The other colors we tested out were BM Simply White and BM Decorator’s White. I highly recommend testing out paint colors for your cabinets on every single wall because different colors looked completely different on opposite sides of the kitchen!
The cabinets have a really nice finish to them & I think most of that is attributed to the fact that they were sprayed. They also seem durable and have been able to be wiped clean when we have spilled anything or the kids have touched them with dirty hands.
$4,100
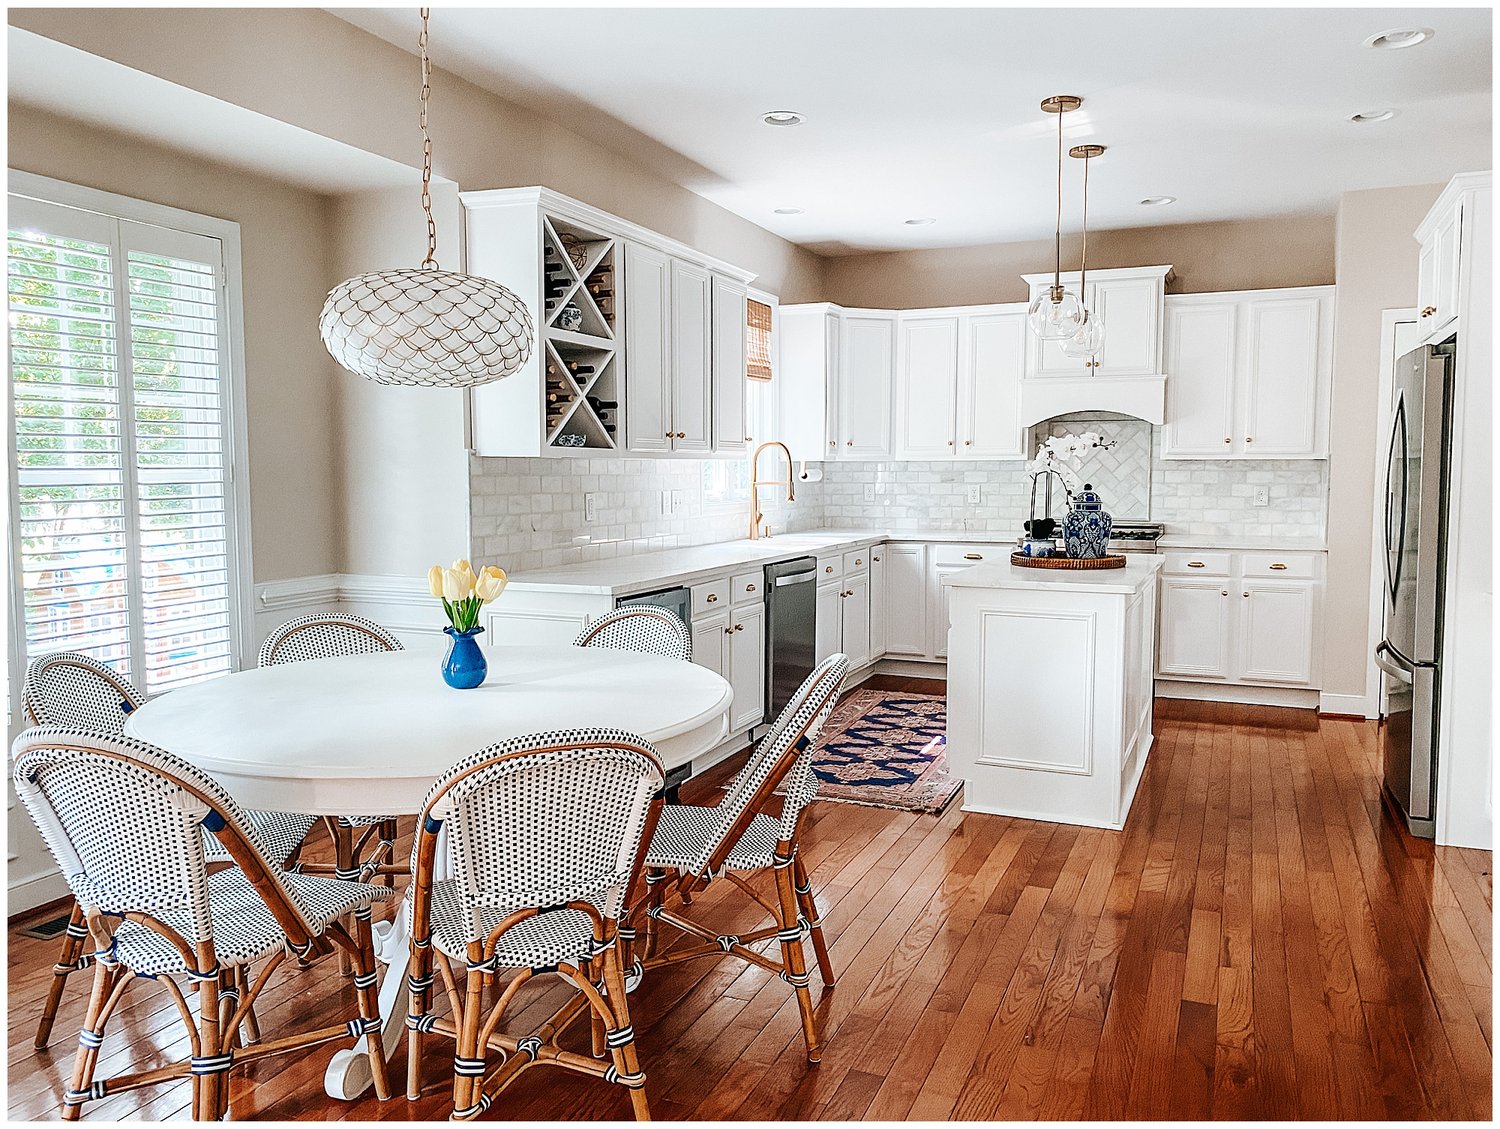
Accessories
We made a few changes to the lighting and shades in our kitchen reno too. We played with pendant options for a few weeks but because our island is so small, many of them just looked wrong for the space.
If you’re looking for a helpful article about how to decide on pendant size, I recommend this one.
I ordered these brass pendant lights from West Elm. I liked that they had a few sizes to order from and also that they were glass which helps to keep our small kitchen feeling open.
The shade was ordered custom from Blinds.com. I was super impressed with it and ordered one for our back door too. Originally, I was hoping to order the shades from Home Depot – the ones linked below are gorgeous in my friends home but they were backordered all spring.
I sent the dimensions to Blinds.com and picked our material and they arrived to our front door just a few weeks later. They were slightly delayed but considering the worldwide delays we have seen lately, it wasn’t that bad. They are easy to adjust and are strong enough that we aren’t worried about the kids breaking them.
$350

Budget Breakdown
Kitchen Appliances | $3,000
Quartz Countertops – Panda Kitchen & Bath – Calcutta Dream | $4,123
Marble Backsplash – Gifford Ceramic Tile/Morris Tile Distributors | $2,962
Trim Work – Lowe’s & Jake Dombroski’s Miller Lite Fund | $800
Sink & Faucet | $675
Cabinet Hardware | $550
Cabinet Painting – All About Paint | $4,100
Accessories $350
Grand Total | $16,560
To be honest, when we started, we thought a “budget” around $10,000 (after appliances) was a reasonable spot to be. You can see how that turned out…
I will admit, I really blew the budget when it came to the backsplash. When we started, we were going to go with a ceramic tile backsplash and we were going to install it ourselves. As we continued through the process, I fell in love with the idea of a marble backsplash. Once we decided on marble, we knew the installation would be more challenging which would mean we needed to hire it out as well. That increased the budget in both the materials and the installation. Looking back though, I don’t regret it – it was well worth hiring a professional for that step.
Have questions about the process or an item I didn’t mention? Send me an email or an instagram message!
Links to Shop

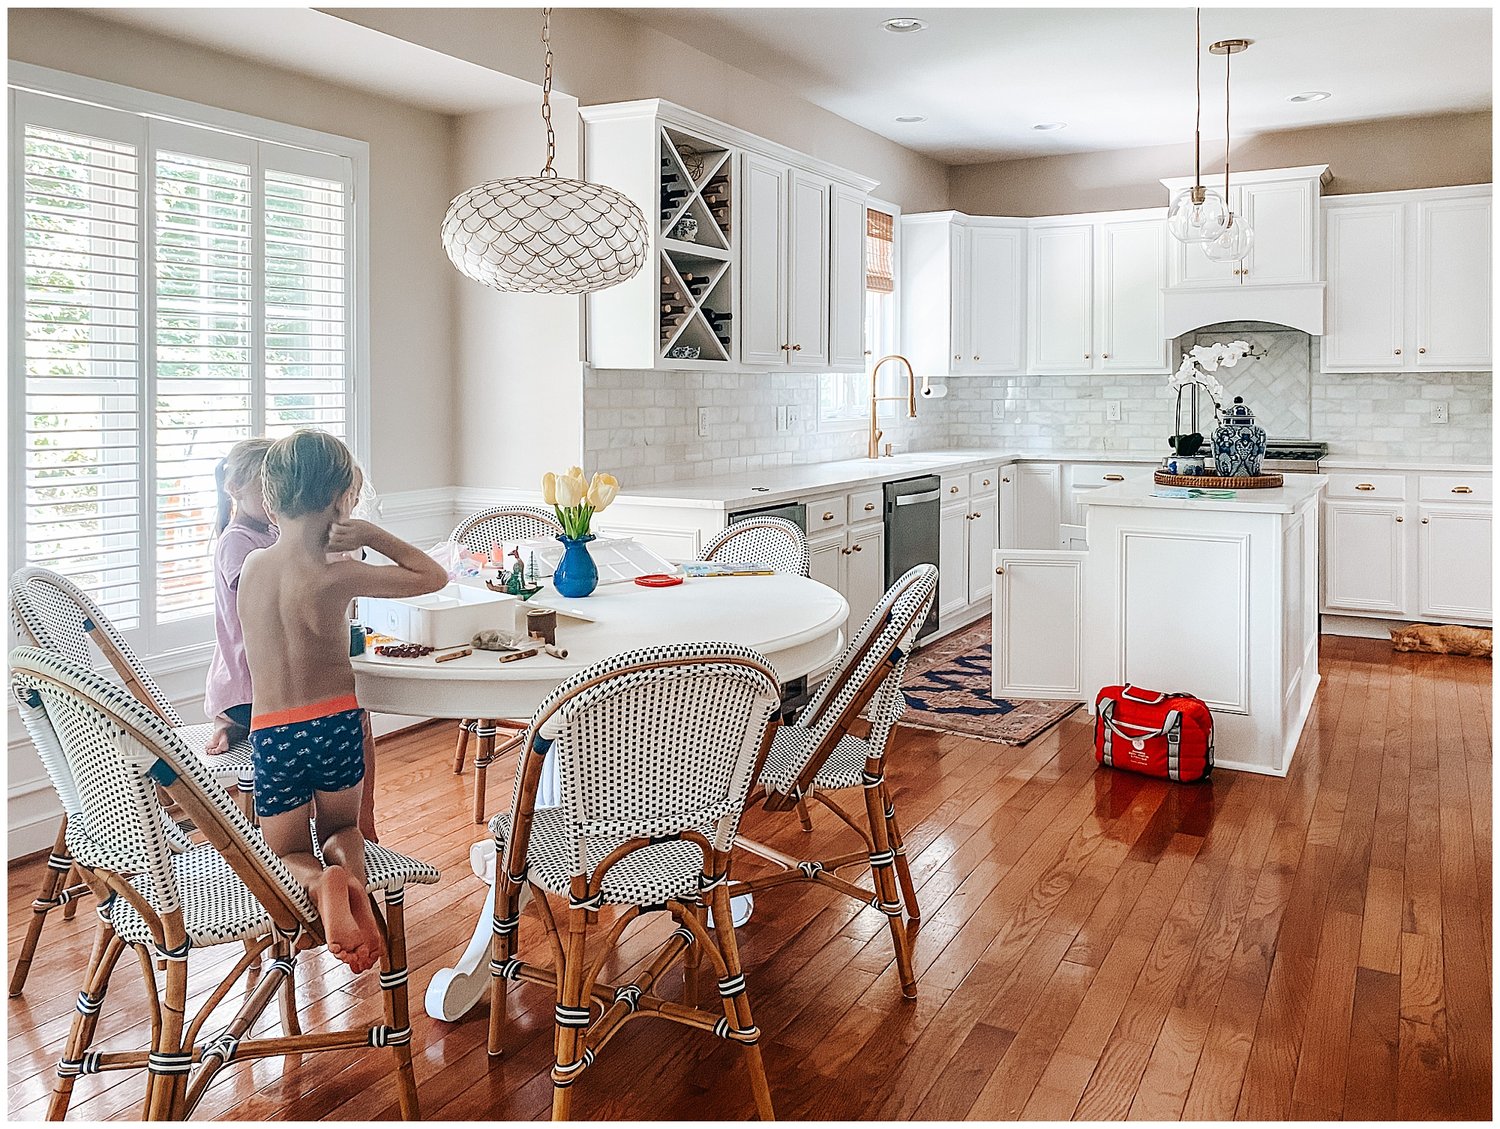
And just to keep me humble and honest – here is what our kitchen usually looks like. Filled with random crafts, pets, dishes in the sink, and half-dressed kids.


")

")


